

Process 1: Create CSR on IIS 10
- Open the IIS (Internet Information Service) Manager from the Start Menu of your Windows system.
- In the Connections Menu, click on Server (Domain\…)
- Double-click on Server Certificates from the IIS panel.
- A new SSL Certificates view will be here.
- From the Actions menu in the top right corner, click on Create Certificate Request
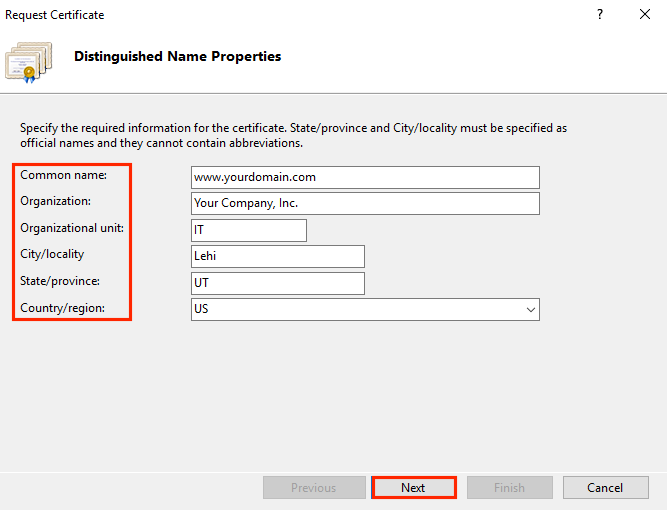
- Request Certificate dialogue will be on your screen, add following properties one by one and then press the Next button.
- Common Name: Name of your Certificate (Domain)
- Organization: Business Name
- Organization Unit: Type of your business
- City/Locality: City name
- State/Province: State Name:
- Country/Region: Country Code
- Now, you need to select the Cryptographic Service Provider Properties and press the Next button.
- Select Microsoft RSA SChannel Cryptographic Provider as a Cryptographic Service Provider
- Select 2048 as the Bit Length.
- In the File Name tab, you need to add the location where you are wishing to save the CSR File and then press the Finish button.
- Access the location which you have added recently and open the CSR file with a text editor, the CSR file will be in the following format.
- Once the Certificate Authority provides you the Certificate files, the next step is to use the SSL Files and CSR file to install them on your Windows server.
Process 2: Install SSL Certificate on IIS 10 (Windows Server 2016) – Single Domain Certificate
- Open the IIS Manager from your Windows system
- In the Connections Menu, click on Server (Domain\…)
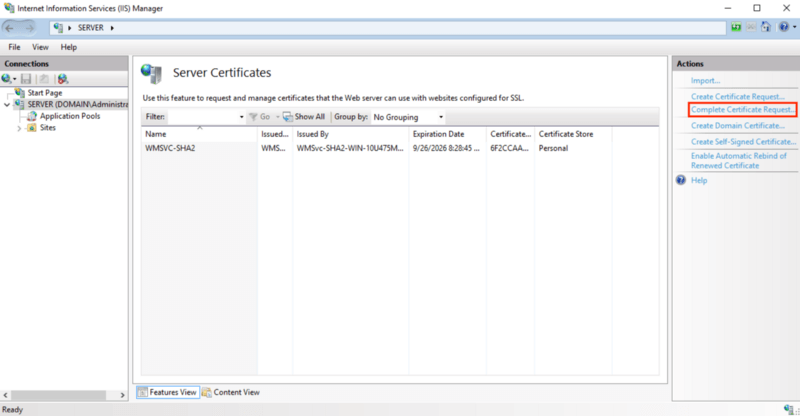
- Double-click on Server Certificates from the IIS panel.
- Now, from the Actions tab, click on Complete Certificate Request.
- Here, you need to
- specify the location (directory) of the Server Certificate (SSL Certificate)
- add a friendly Domain Name
- select a proper Certificate Store from the dropdown list.
- Press the OK button.
- Finally, the SSL certificate is now installed.
Now, Assign the SSL to the Domain name
- Open the IIS Manager from your Windows system
- In the Connections Menu, click on Server (Domain\…)
- Double-click on Server Certificates from the IIS panel.
- Now, from the Actions tab, click on Complete Certificate Request.
- Here, you need to
- specify the location (directory) of the Server Certificate (SSL Certificate)
- add a friendly Domain Name
- select a proper Certificate Store from the dropdown list.
- Press the OK button.
- The SSL certificate is successfully installed.
- From the IIS, in the Connections tab, expand the Server where your SSL was installed recently.
- Expand the Sites and click on the website for which you are wishing to assign the SSL certificate.
- From the Actions tab, click on the Bindings… link.
- A new Site Bindings windows will open, here click on Add button
- Select following details one by one
- Type: HTTPS
- IP address: All Unassigned
- Port: 443
- SSL Certificate: select the domain name from the list
- Hit the OK button.
- Finally, your SSL certificate is now configured for your domain name, and now your website is enabled with HTTPS://.
Process 3: Install SSL Certificate on IIS 10 (Windows Server 2016) – Multiple Domain Certificate
This process is divided into two roots.
Installing the SSL Certificate on base Domain
- From the IIS, in the Connections tab, expand the Server where your SSL was installed recently.
- Expand the Sites and click on the website for which you are wishing to assign the SSL certificate.
- From the Actions tab, click on the Bindings… link.
- A new Site Bindings windows will open, here click on Add button
- Select following details one by one
- Type: HTTPS
- IP address: All Unassigned
- Port: 443
- SSL Certificate: select the domain name from the list
- Hit the OK button.
- Finally, your SSL certificate is now configured for your domain name, and now your website is enabled with HTTPS://.
Installing the SSL Certificate on Additional Domains
- Open the IIS Manager from your Windows system
- In the Connections Menu, click on Server (Domain\…)
- Double-click on Server Certificates from the IIS panel.
- Now, from the Actions tab, click on Complete Certificate Request.
- Here, you need to
- specify the location (directory) of the Server Certificate (SSL Certificate)
- add a friendly Domain Name
- select a proper Certificate Store from the dropdown list.
- Press the OK button.
- SSL certificate is now installed.
- From the IIS, in the Connections tab, expand the Server where your SSL was installed recently.
- Expand the Sites and click on the website for which you are wishing to assign the SSL certificate.
- From the Actions tab, click on the Bindings… link.
- A new Site Bindings windows will open, here click on Add button
- Select following details one by one
- Type: HTTPS
- IP address: All Unassigned
- Port: 443
- Host Name: type the hostname which you are wishing to secure
- Mark Required Server Name Indication
- SSL Certificate: select the domain name from the list
- Hit the OK button.
- Finally, SSL certificate is now configured for Multiple Domains.
Establish a secure server connection
You learnt how to generate a code signing request for Microsoft IIS 10, now choose and install some of the best SSL brands at a substantial discount of up to 70%.